Evos ACLSW 421 Badge Access Request Here |
Signup to use microscope. Must use Safari, Chrome, or Firefox; not Explorer |
Instructions: [Word doc] [PDF] Additional timelapse Instructions click here |
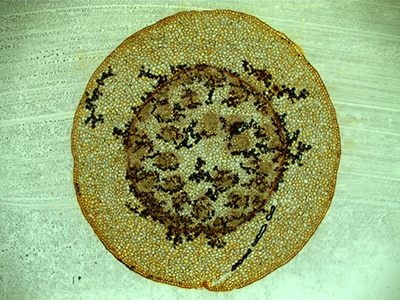
| This microscope is for widefield fluorescence, simple brightfield, and phase contrast. Example images here. The primary purpose of this microscope is screening cells in dishes. The lenses are not the best, but it is designed to be easy to use and give decent images with minimal microscopy expertise. It can be used for chromogenic histology. It can tile large areas, has Z series, and may repeatably image multiple positions. It may be used for live imaging and for fixed samples. A few of the specifications:
Common problems to avoid: Always keep good notes on lens used. Better to put in the filed name, such as "control 01 20X.tif". If you want full resolution images, save as TIF. If you want to quantify intensity, save each channel separately in original 16 bits and make sure light intensity, exposure time, and gain are set the same for all images in a session. |
Want to read the whole manual? Here it is. |
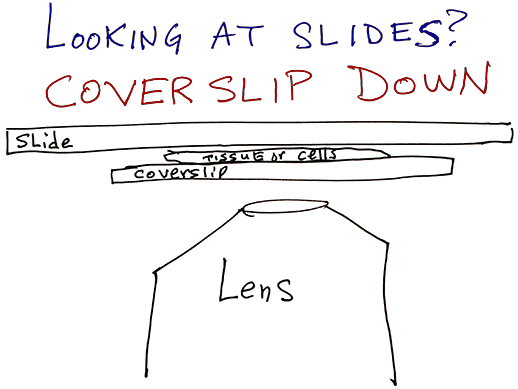
Instrument calibrated for samples that have coverslips on them. Images from thicker bottom dishes may look ok at 10X and 4X, but lenses really designed for #1.5 coverslips.
One of the selling points of the Evos is the ability to use in a fully lighted room. If you need to keep the sample dark, put the Evos supplied box over the sample or put black cloth or cardboard over sample. Other people in the room may need the lights on and this is acceptable.
Please always put stage plates in the plastic bin with the other stage plates. Do not leave stage plates on table etc.
Instrument must be left in standard configuration with buttons in this order:
![]()
There are Cy5 & YFP blocks available. Please contact Microscopy Lab staff if you need to use them. (Most YFP imaging will work ok with the GFP block.)
Unfortunately, there are not enough positions in the system for Cy5 to be included in the standard lineup.
Storing Data
You need to bring a USB key or an external USB hard drive to the microscope. This is the only way to store your data.
You may connect to the research server to transfer data at the end of the session, but the Evos software will only save to a USB device. (Therefore, IT dept should allow you to purchase an external USB device.)
Tiling / Mosaics
When done, the stitched composite may be rescaled smaller before being automatically saved. This means that if you used a 20X or 40X lens, the resolutioni s lost.
To
solve this problem, go tot he Export tab and save the image as High resolution TIFF.
Timelapse Instructions click here
WARNING: Images may not be saved with proper (or any) scaling information embedded in them.
Always put lens magnification in filename &/or folder name!
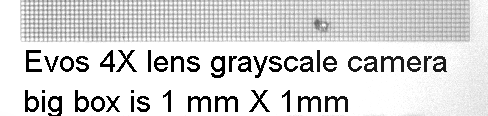
Based on measurements 20170308, each pixel with each lens is: (We will confirm these numbers and repost any changes if needed.)
| Magnification | N.A. | XY color camera | YX grayscale camera |
| 4X | 2.25 um | um | |
| 10X | 0.9 um | 0.9 um | |
| 20X | 0.45 um | um | |
| 40X | 0.22 um | um |
If need a scalebar in ImageJ, Image > Properties and type in the X and Y for Pixel width and Pixel height respectively and then Analyze > Tools > Scalebar...
For a precise scale bar, save the appropriate picture below and open it with the image you need a scalebar for. You can draw a box over this and then move over your image or measure in ImageJ and set scale.


DO NOT TOUCH CALIBRATION SETTINGS IN TAB ON FAR RIGHT!!
When microscope calibrated correctly (as of today 8 Mar 2017), you can focus at 4X (image at left) and then click on the 40X lens and be in the same location needing only a tweak of the focus (image at right).
 4X lens |
 40X lens (original size image 5X pixels linearly in each X and Y) |
What about the corners being dark and slight gradient from top to bottom? This cannot be changed in the raw data. If correction images are collected, may be postprocessed using flatfield correction. FFT highpass with 256 pixel window may also work.