Zeiss AxioObserver microscope
Skirball 2nd floor
To use microscope you must be trained by Michael Cammer or Yan Deng via the Microscopy Core.
** Signup to use microscope ** Must use Safari, Chrome, or Firefox; Not Explorer
This microscope may be used to look by eye without the computer. The touch pad and the buttons on the front of the microscope will operate all function required to look by eye.
When using the computer, only store files on Drive D:
DO NOT STORE FILES ON DESKTOP or anywhere on Drive C: including "Pictures" folder.
Files left on the Desktop or Drive C: may be deleted without warning.
A few of the specifications:
- Zeiss AxioObserver.Z1
- EC Plan-Neofluar 10x/0.30 Ph1 WD=5.2
- Plan-Apochromat 20x/0.8 WD=0.55 M27
- EC Plan-Neofluar 40x/0.9 Pol WD=0.41 M27
- EC Plan-Neofluar 40x/1.3 WD=0.21 M27
- Plan-Apochromat 63x/1.40 Oil DIC M27
- DIC Sliders f/20x, 40x and 63x
- Cond LD 0.55 H/DIC/Ph 6x Mot
- FL Filter Set 49 DAPI
- FL Filter Set 38 HE GFP
- FL Filter Set 43 HE Cy3
- FL Filter Set 50 Cy5, EX BP640/30 S free
- FL Filter Set 46 HE YFP shift free available on request
- FL Filter Set 47 HE CFP shift free available on request
- 50/50 mirror available on request
- Light Guide HXP120, 2m
- Axiocam 503 Mono
- Axiocam 503 color
|
 |
Quickstart Guide
- Sign in logbook
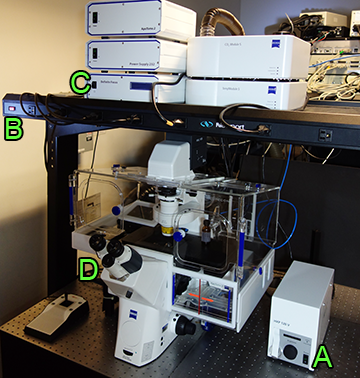
- If using fluorescence, turn on HPX 120V power supply (on table to right of microscope) A
- One power switch at far left of overhead power strip to turn on accessories B
- Optional: if you need the autofocus, press the button on the front of the Definite Focus box C
- Push power button on back left of microscope body D
(When the touchscreen pad shows microscope controls, the microscope should be ready to use by eye.)
- Make sure ApoTome is removed from light path unless you are using it.
Apotome in light path |
|

One click to right
Apotome out of light path |
- If you want to use the computer, turn on or wake up computer
- Log in to Zeiss account
- Run Zen
- Best way to load settings:
Open an image from an earlier session that worked well.
Click on Acquisition tab; this will not work in Locate menu.
Click "Reuse" button to load settings.
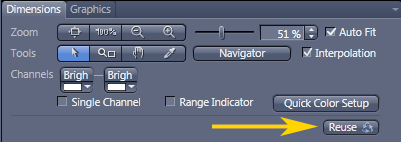
People keep saving over the settings in the Experiment Manager pull down menu so settings loaded from the menu are likely to be incorrect.
- If you set up channels manually, you must read this.
- If you are looking by brightfield, DIC, Nomarski, crossed-polarization, or phase contrast, you must set up Köhler illumination.
See this webpage http://microscopynotes.com/koehler/ and follow step by step:
- Put your sample on the microscope
- Using the touch pad turn on TL or use the computer "Locate" tab and click on Brightfield, DIC, or Phase.
- Adjust light on front bottom of microscope
- Open iris diaphragm
- Focus on sample
- Close field diaphagm
- Using knobs next to condenser to move it up and down, focus light to a small bright spot
- Using small metal knobs on front of condenser, center small bright spot.
- Open field diaphragm slowly to edge of field of view. Do not open all the way!
- For simple snapshots, you may want to set up autosave to save in both Zeiss native format and export as TIF.
Do not save as jpeg!
Make sure you update the file name each time you switch to a different sample!

Click here for screen snap of how to export TIFs from the Processing tab, especially useful after stitching.
=====================
Incubation - Heater
The incubator may be turned on only from the Zen software.
The button is in the Locate tab at the bottom of the Light Path window
in the Locate tab
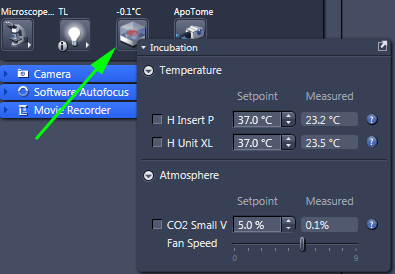
The small touch screen pad on the table does not connect to the incubator!
If using CO2 tank, need to make sure hoses & regulator connected
====================
Shutdown
- Make sure all data copied to shared server space server space.
- Focus lens to lowest position.
- Check online signup whether anyone is signed up after you.
- If someone is on after you:
If they are using fluorescence, DO NOT turn off HPX 120V power supply.
Log off computer
- If you were using the incubator, turn it off from within Zen software.
- If no one after you:
Shut down computer
Turn off fluorescence lamp A
- One power switch at far left of overhead power strip to turn off microscope & accessories B
- Sign out logbook
- Clean up!
Apotome Instructions
click here
About the microscope
Multiposition Timelapse
Click here for screen snap of multiposition Z channels timelapse.
Quantification
If you save your files in the .czi format, there is a wealth of metadata available for quantification. These files can be opened in ImageJ when the LOCI plugins are installed. However, if (for whatever reason) files are saved as tif, here is an example of measuring areas when images are taken with a 10X lens and no binning.
If you save your files as jpg, why bother imaging with a top-of-the-line microscope? Let's take high resolution pictures and then save them with lossy compression.
<-- Back
comments, questions, suggestions for this web page: Michael.Cammer@med.nyu.edu or mcammer@gmail.com