Michael's notes on IJ installation
There are 2 ways to install ImageJ.
1. Fiji - comes packaged with many additional plugins of varying quality from great additional functionality to not well characterized
2. ImageJ - smaller. Was my preference before 2020 but now I prefer Fiji.
For installing either or both:
Unless you have full administrative permissions, do not install in the Programs Files directory or Applications (on Mac). Also, recommend do not install on desktop, especially if your computer has a home drive on a network, unless you specifically want to be able to access from any computer anywhere.
Recommended: install in your documents folder. If you are on a network, make sure this is the local documents folder (unless you specifically want it on the network).
Installation is just copying a folder containing a bunch of files to your computer. It's this simple. You can even keep it on a USB key to run it anywhere USB drives work.
To install
Fiji: Download at http://fiji.sc/
Then follow Next Steps below for updating, setting memory, and setting up additional macro &/or plugins commands.
or
ImageJ: Download from http://rsbweb.nih.gov/ij/download.html.
Install bundled with Java 1.8
If you have problems installing on Mac, please look here.
You need to install the LOCI Bio-Formats so that you may open files
saved in different formats. The file is named "bioformats_package.jar" and goes in the plugins folder in the ImageJ folder. Get it here https://www.openmicroscopy.org/bio-formats/downloads/
Next steps
First time you run Fiji, it may ask you to update. I select no and do not remind again.
(You may opt differently.)
This is not important. The next step is essential.
Help > Update ImageJ... > Upgrade to: daily build [click here for more details]
Edit > Options > Memory & Threads... > Set for memory allocated to IJ images, this is going to vary widely depending on the sizes of your images and the computer you have. I have it set to 12000 on my SurfacePro with 16 GB of RAM.
Check the box Run garbage collection on status bar click.
Optional: If you have a package of favorite macros, put them in the macros directory and rename the file "StartupMacros.ijm". This way, they will automatically load at startup. I do this with the macros at http://microscopynotes.com/imagej/macros/useful collection_v100.ijm so that my most used macros & functions automatically load.
Some additional info
ImageJ with Bio-Formats plugin opens raw data as they appear in the original software with the benefit of preserving the underlying raw data.
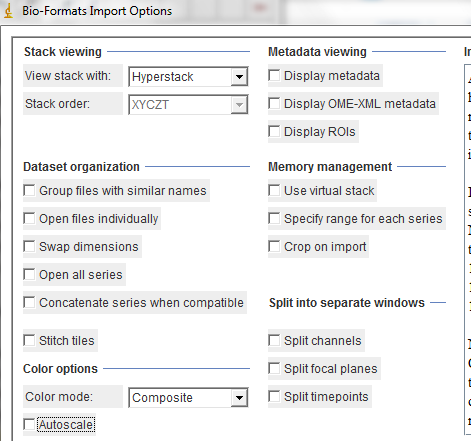
With Hyperstack and Composite selected in the top left and bottom left of the import settings menu, raw data from most commonly used microscopes will open properly. (Split Channels should NOT be checked.)
The Autoscale button is optional. It does not change the raw data but rescales each channel's display linearly.
The version of ImageJ running on my personal computer opens files from Zeiss Zen and Nikon Elements as they displayed originally (when you choose Hyperstack and Composite in the menu).
There are more recent versions of Bio-Formats that work with more formats, but this works for all the Zen and Elements files I've encountered at work.
As of June 2023:
* ImageJ 1.54
* Java 1.8
* Bio-Formats 6.9.1
Click here for a webpage primer on working with channels.
There are also ways of changing the colors and contrast uniformly across datasets.
Let's say you have a directory with 37 images that were taken exactly the same way and you want them all output as a montage of each channel with a merged image and a scalebar on each one in a format you could paste into PowerPoint. Instead of processing each one manually, why not use a macro that will process the entire directory for you? We can modify this macro to do automated tasks such as this as you need them.
Or let's say you have all nuclei in one channel stained with dapi (blue) or DRAQ5 (far-red) and you want to know the intensity of histones in the nuclei stained with Alexa488 (green) and in a different channel the protein levels for each nucleus immediately outside the nucleus stained with Cy3 (red). This may be automated.
Furthermore, let's say you need to manually outline different regions and have the counts described above reported separately per region. ImageJ can do this too and label them, such as reporting independently for "White Pulp", "Red Pulp", and "Marginal Zone".
Other plugins you may find useful are at http://rsbweb.nih.gov/ij/plugins/index.html. http://fiji.sc/Fiji is another great resource. We are (slowly) building a library of macros here too, ../index.html, but they aren't necessarily user friendly or well documented. Most need customization for individual datasets.
Instructions how to use ImageJ. https://imagej.nih.gov/ij/docs/menus/image.html
Want to know more about the history of ImageJ and how it is pioneering in the field of image analysis, way ahead of commercial products? Read this article in Nature Methods.
last updated 20230615; first written for covid shutdown ImageJ online course 202003
![click here for more details]](update_imagej_in_menu.png)