Zeiss LSM 880
** Signup to use microscope ** Must use Safari, Chrome, or Firefox; not Explorer
Skip to Instrument Specifications below.
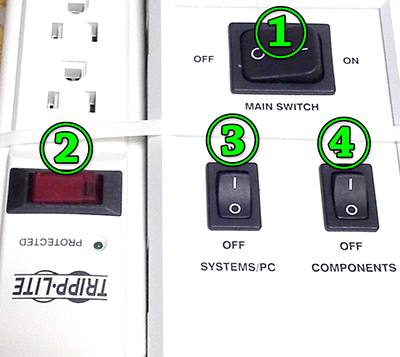
Startup:
| DO NOT touch any switches except the the ones in these instructions. If you are only using the computer, only turn on the switches in step 3; leave all the other ones off.
|
General Confocal Best practices:
Oil and Water lenses
Use special 30 degrees oil for incubation only.
Use 1.518 oil for RT.
Use Immersol W or GenTeal for water lenses.
DO NOT LEAVE IMMERSOL W BOTTLE ON THE TABLE.
AT THE END OF YOUR IMAGING SESSION, MAKE SURE YOU RETURN IT TO THE SHELVES at the back of the room.
Saving Files
All files should be stored in one of these two locations.
D:\User_Data\
D:\SWAP\
Files left on the desktop. drive C, or Picture folder will be deleted.
.czi always.
Move data to your lab's shared server space.
Always save files as CZI. These files can be opened directly into image analysis software. These files retain instrument settings, channel integrity, bit depth, and spatial scale that may be necessary for image analysis.
If you save files as TIFor other formats, the integrity of color channels may be lost and you will have no metadata regarding instrument settings and spatial scale.
Tiling or mosaic images need to be stiched in the Process tab with fuse tiles turned on.
Detectors
CH1 and CH2 GaAsP detectors require 500V gain minimum.
For BiG use plate, not mirror. Filter blocks installed manually in side. Blocks for red/green and CFP/YFP.
True spectral imaging. An example of a result here.
Software Help
Click on ? button in upper right and then click on thing on screen want help with.
Tiling
First do 128X128 large area fast overview tile scan.
Put in new container.
Click stage (or use positions to set multiple Z)
12% overlap.
Zen Blue for post processing stitching.
My AiryScan instructions: Word or PDF
I really like this document's description of AiryScan and how to do it: https://imb.uq.edu.au/files/2084/The%20Zeiss%20AiryScan%20System.pdf (and cached here).
Here is Zeiss official document on AiryScan.
Also, this doesn't match our system precisely, but a very good set of instructions by Mt Sinai.
Key points:

Power down if no one using system immediately after you:
Turn off Ar laser in software.
Quit software.
Transfer files to server.
Shut down computer (menu from button lower left of screen or from Ctrl-Alt-Del).
After computer shut down, power switches off in reverse order as startup.
DO NOT turn any key.
If you did not touch the switch on startup, do not touch it on shutdown.
Power down if yes someone using system immediately after you:
Transfer files to server.
Do not turn off Ar laser in software.
Quit software.
Log out of computer but do not shut down (menu from button lower left of screen or from Ctrl-Alt-Del).
Log in quickly and immediately start Zen again.
Axio Observer.Z1, Zeiss full environmental chamber with temp/CO2
Lasers at 405, 440, 458 (weak), 488, 514, 561, 594, 633 nm.
Autofocus system using 780(?) nm laser. Especially useful for multifield timelapse imaging. Keeps focus locked for hours-days.
Detectors that may be used simultanously for standard imaging:
PMT "Ch1"
34 spectral channel GaAsP which may be defined as multiple channels or binned as desired "ChS1" to "ChSn"
PMT "Ch2"
T-PMT (transmitted light; align condenser to use)
Flip the mirror for:
Detectors that may be used simultanously for FCS, FLIM, low light with manually installed bandpass filters:
GaAsP1
GaAsP2
AiryScan "ChA"
Example time domain FLIM using 440 PicoQuent laser.
Maintenance issues:
MIC-SYSTEM Ser Nr 2802000293
Scanmodul 34Ch-G 24V= 1997-779
and
Rack LSM 880
Ser Nr 2817000414
A few examples:
Mitochondria live cell imaging
comments, questions, suggestions: mcammer@gmail.com