0 445 nm CFP 480 +/- 20
1 488 nm GFP 525 +/- 25 [specifications]
2 514 nm YFP 550 +/- 30
3 561 nm mCherry 605 +/- 35
Toggel FLIM camera on Nikon Eclipse TE2000 microscope
To sign up: https://nyumc.ilab.agilent.com/schedules/492574#/schedule/week7/
Everyone who uses this system should read the manual beginning at p. 7 through to the end.
Official manual [PDF]
This camera, with excitation of fluorescent molecules at 445, 488, 515, and 561 nm, directly images widefield microscopy as fluorescence lifetime on a pixel-by-pixel basis. The camera on an inverted fluorescent microscope simplifies FRET assays. In live-cell experiments, the built-in time-lapse function tracks changes of fluorescence lifetime over time.
This microscope measures fluorescent liftimes of standard fluorescent probes used in biology studies, for instance CFP, GFP, YFP, and mCherry. Imaging is performed in standard widefield fluorescence mode with a camera that is synchronized with pulsed lasers to collect multiple phases which can easily be remapped as fluorescence lifetime.
Why would you want to use this? One application is a fast replacement for ratio FRET.
Let's say you have a cerulean-mVenus biosensor and want to quickly (15 seconds per image) see activity in single cells. It directly shows you results and has an advantage over standrad ratio FRET in that it can sort pixels into different lifetime bins; subtlety (or mixed populations of molecules) that is obscured in ratio FRET may be detected by this method.
Basic methods
Image a reference standard (of known lifetime).
Image samples and offset from the reference.
Startup
To Turn On:
Troubleshooting if camera not available in software:
To shut down, reverse order.
Computer may stay on. Log out if you connected to servers on the network.
Do not use computer for any commercial web surfing.
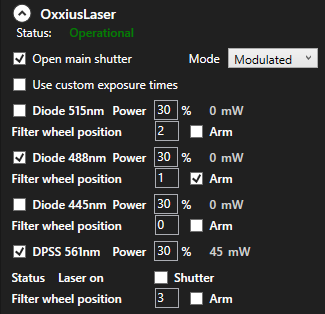
When you startup the software, the lasers and matching filters need to be set manually.
You need to manually set the correct dichroic mirror in the microscope filter turret manually using the touchpad to the right of the microscope.
3 CFP-YFP
4 GFP-mCherry
In the software, you need to enter the filter numbers to match the lasers and set the laser powers.
Good starting position for the lasers you will be using is 30%. (You may set whatever works for your experiments.)
The filter positions need to be set.
0 445 nm CFP 480 +/- 20
1 488 nm GFP 525 +/- 25 [specifications]
2 514 nm YFP 550 +/- 30
3
561 nm mCherry 605 +/- 35
Camera gain in range 1 to 4.
Exposure time > 34 ms.
Goal: set maximum intensity at 1600 counts or greater by changing phase until brightest possible signal and using laser and exposure time to achieve intensity value.
Lower than 1600 will be too noisy (depending on gain).
Greater than 4000 may be unnecessary overexposure, but this is your choice.
The camera has a range up to 16383.
Number of phases is how many pictures will be taken. This defines the precision of the lifetime measurements.
![]()
(Total time to take a lifetime dataset is number of phases X exposure time)
Laser frequency 40 MHz.
Shutter box unclicked is light off.
Focus knobs on left and right side of microscope behave differently.
Use left size for fast gross focusing. However, fine focus may slip.
User motorized knob on right to lock the focus and have fine control.
Lifetime calibrations need to be imaged through the same coverslips.
We need to run experiments to check whether this is really an issue, but until we know for sure, do this.
Because chip has large wells, it undersamples the resolution of the lenses. For the highest resolution with the 60 lens, snap into place the 1.6X magnifying lens. For larger fields of view, use the 40X lens with the lens inthe 1X position.
Files open automatically in Fiji/ImageJ. Each phase is slice in a stack.
Color snapshots may be merged with Image > Color > Merge channels...
When in the lifetime mode, right click on the image to export as tif where the scale is in picoseconds.
Technical information
Dichroics - set using pad to right of microscope body.
3 CFP-YFP
4 GFP-mCherry
diode lasers (445, 488, 515) vs dpss (561)
Filter turret positions:
Lasers have a threshold setting at approx 5%. Setting them lower may not provide any light.
561 nm line is controlled by AOTF, not direct voltage to laser, so may need to always have it checks as active to keep AOTF engaged.
This system originally had a quad block that matches Lumencor LEDs (395, 440, 470, 508, 555, 640 nm & see http://microscopynotes.com/nikoncancer/), but because there is no T connector for sending light into the microscope, we pulled it. Therefore, the only fluorescence channels on the microscope are those provided by the lasers for FLIM. If there is demand, we could put the block back in, try to program the Lumencor from MicroManager, and manually swap the liquid light guide for illuminate based on application.
Live cell imaging
All lenses expect #1.5 coverslips. (More info here.)
No phenol red in media.
Three options for gas:
Media atmosphere
Hepes L15
Media co2
Microscope can be heated. This should be turned on 2+ hours before imaging.