

Skip to Startup Instructions
** Signup to use microscope ** Must use Safari, Chrome, or Firefox; not Explorer
Introduction
Nikon TIRF/Epi-Fluorescent Microscope, which is located on the second floor of Skirball, is multi-use for high end applications.
- TIRF (Total Internal Reflectance Fluorescence) microscopy with an EMCCD camera or sCMOS camera images a defined volume less than 200 nm deep at the substrate. This allows for exceedingly high contrast, high spatial resolution, and high speed imaging of few molecules. (See image above.) Preparations require a #1.5 glass coverslip and aqueous media.
- Widefield fluorescence microscopy including long time lapse and high speed movies with extra wide field of view.
- Ratio FRET (Förster Resonance Energy Transfer). Using separate color LEDs for excitation and independently addressable filters for emission, ratio FRET can be done on both live and fixed material.
- Built on Nikon Eclipse Ti-Eclipse inverted microscope
- Objectives:
Plan Fluor 10x/0.3 Ph1, Plan Apo 20x/0.75 DIC, S Plan Fluor ELWD 40x/0.6 Ph2, Plan Fluor 40x/0.75 DIC, Plan Apo λ 60x/1.4 Oil Ph3 and Apo TIRF 100x/1.49 Oil DIC
- Fluorescent filter blocks: Dapi, GFP, RFP, Cy5, CFP, YFP with mix-and-match excitations and emissions
- LED Illuminator for epi-fluorescent illumination
- TIRF Lasers: 405 nm, 488 nm, 568 nm, and 641 nm.
- Dual cameras: Andor iXon EMCCD and Zyla sCMOS
- Environment chamber with heat unit
- Motorized stage for tiling and multiple fields imaging
- Motorized focus and autofocus module for 3D and time lapse
- NIS-Elements Advanced Research for multi-dimensional image acquisition, processing and analysis
 |
|
Fluorescent timelapse Z series and phase contrast image. One small area of one field shown. Experiment was able to image 9 large fields with Z series per minute at high spatial resolution. Experiments may be run overnight. |
Basic Startup
- Sgn in log book.
- If doing TIRF, turn on lasers you need.
- One power switch at far right of overhead shelf turns on microscope components.
- Turn on computer or, if computer already on, restart it.
- Run Nikon Elements software.
- Most people will choose one camera. "Andor Neo/Zyla" is the most common camera for standard imaging. "ANDOR" is for low light or most TIRF.
- Macro > Run Macro From File
C:\Program Files\NIS-Elements\Macros\delete all settings.mac
or
F:\Your_Directory\delete all settings.mac
- Calibration > Optical Configurations (Ctrl N)
- Import Optical configurations
F:\Your_Directory\last_file_that_worked_well.xml )
This means that when you change your optical configurations, you should export a copy of your lastest working version to your directory. Remember to do this every session you change your settings!!
- Set lens.
- Check knob on front of microscope is set to correct magnification.

Make sure the number is set correctly in the software.
In the software you may set the eyepiece magnification in one of the icons at the top of the screen, in the Ti Pad window, and in one of the menus.
- If using a red probe (i.e. Alexa 568 or RFP, check filter labelled "550" set correctly in illumination source.

- In the ND Acquire window set up a directory where you will save this session's files.
| OS (C:) |
NEVER. Image files saved here (including on the Desktop) may be deleted without warning. |
| Data Acquisition (E:) |
For the fastest imaging. At the end of your session please copy files to F: and delete from E: |
| Data Storage (F:) |
Standard hard drive. Please keep your settings files and images here. We'll make clean up policy based on how fast this fills up. But copy all your files off this computer immediately after imaging!! |
- Put sample on scope & image...
- Connect to your shared server space to store your files after image collection.
Timelapse tips:
Make sure Transmittled light filter set the same as latest used or next-to-be-used Zyla wheel filter.
In ND Acquire XY positions, make sure:
Leave PFS offset ON between points is clicked.
Include Z not clicked.
Two Cameras
When you start the software, you must choose the correct camera(s). What you should choose is in this table.
Make sure you always use the same one. Your settings will only work properly when you have started the system with the correct camera.
YES! This is for standard epifluorescence only

|
DO NOT USE
 |
YES! This is for TIRF Only
 |
DO NOT USE
 |
Maybe. This is for special applications.
 |
DO NOT USE
 |

There are two cameras.
1. The Ixon DU-897 camera on the left is the original 512 X 512 pixels for TIRF.
2. The Zyla camera on the right is new for widefield imaging (and in some cases TIRF).
There are two sets of controls for the illumination and filter wheels associated with each camera.

Buttons defined for different methods are grouped into four main categories. (Maybe a future release of the software will let us make buttons different colors...)
Use for standard imaging:
- The ZYLA buttons are recommended for most imaging because they are narrow pass lower noise.
- The TIRF-HSN buttons are the ones used most because the have higher signal to noise.
Use for extra high speed imaging:
- The ZYLA HS buttons are for the fastest imaging but potentially lower contrast.
- The TIRF buttons are for ther fastest TIRF imaging but allow for spillover of channels and may have higher background due to illumination leaking through.
Excitation/Emission
Widefield Excitation spectra choices:

Zyla camera emission choices:

TIRF laser choices:
405 nm, 488 nm, 561 nm, 641 nm
| DU897 camera emission choices: |
 |
|
- ET450/40M 218825 (dings on camera side)
- ET525/50M 122307
- ET600/50M 218830
- ET700/75M 218815 (ding near edge camera side)
|
For CFP-YFP FRET:
Use CFP-YFP filter block
Excite at 395 nm
Take picture with two different emission filters
If focus needs to be precise, check with TetraSpeck beads and put offset in ND Acquire Lambda window
Important setting on front of microscope and in software
Lambda ND Acquire window
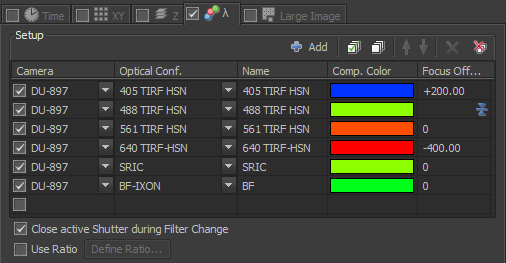
The settings above are for using TIRF to image blue, green, red, far-red, reflection, and brightfield. Note that in the far right column, which is called "Focus Offset", the 488 TIRF HSN setting has a little blue icon.  This means that the focus of the 488 TIRF HSN channel is the reference focus. The "+200" in the 405 TIRF-HSN row means that the focus will be shifted 200 nm from the green channel and the "-400" in the 640 TIRF-HSN row means that the focus will be shifted -400 nm from the green channel. The units are microns and may be read directly fro the front of the microscope orin window inthe software. In addition, you may continue to use the Advanced settings with macros to adjust for chromatic aberration.
Correcting chromatic aberration with the 10X objective lens is a shift of -35 um in the blue channel relative to the green or red channels.The following picture shows that the red channel is the reference focus, there is no Z shift in the green and transmitted light images, andthe blue (Dapi) is shifted by -35 um.

Brightfield with the 100X TIRF objective works well with the EM mode of the camera when the condenser is set for Phase 2.
SRIC or Reflection Imaging
Reflection imaging uses a new green LED light source. To set for reflection imaging, a filter must be removed from this light source unit.
The intensity is adjusted using the Spectra slider labeled 508 nm. 9 is usually good for live imaging.
We highly recommend taking 4+ images of blank fields to do flatfield correction in post-processing.
Always put unused filters in the closed tissue culture dish with the top on. Put the dish over the hole in the top of the unit.
550 and 575
Examples
Protocols:
Selected Publications with data from this microscope
- Santos LC, Blair DA, Kumari S, Cammer M, Iskratsch T, Herbin O, Alexandropoulos K, Dustin ML, Sheetz MP. Actin polymerization-dependent activation of Cas-L promotes immunological synapse stability. Immunol Cell Biol. 2016 Jun 30. doi: 10.1038/icb.2016.61. PMID: 27359298
- Kumari S, Depoil D, Martinelli R, Judokusumo E, Carmona G, Gertler FB, Kam LC, Carman CV, Burkhardt JK, Irvine DJ, Dustin ML. Actin foci facilitate activation of the phospholipase C-γ in primary T lymphocytes via the WASP pathway. Elife. 2015 Mar 11;4. doi: 10.7554/eLife.04953.
PMID: 25758716
- Céspedes PF, Bueno SM, Ramírez BA, Gomez RS, Riquelme SA, Palavecino CE, Mackern-Oberti JP, Mora JE, Depoil D, Sacristán C, Cammer M, Creneguy A, Nguyen TH, Riedel CA, Dustin ML, Kalergis AM. Surface expression of the hRSV nucleoprotein impairs immunological synapse formation with T cells. Proc Natl Acad Sci U S A. 2014 Aug 5;111(31):E3214-23. doi: 10.1073/pnas.1400760111.
PMID: 25056968
- Choudhuri K, Llodrá J, Roth EW, Tsai J, Gordo S, Wucherpfennig KW, Kam LC, Stokes DL, Dustin ML. Polarized release of T-cell-receptor-enriched microvesicles at the immunological synapse. Nature. 2014 Mar 6;507(7490):118-23. doi: 10.1038/nature12951. PMID: 24487619
- Kumari S, Vardhana S, Cammer M, Curado S, Santos L, Sheetz MP, Dustin ML. T Lymphocyte Myosin IIA is Required for Maturation of the Immunological Synapse. Front Immunol. 2012 Aug 17;3:230. doi: 10.3389/fimmu.2012.00230. eCollection 2012.
PMID: 22912631
IGNOR BELOW

To check alignment of laser:
- Put a plain glass slide on the microscope stage and bring the objective with oil on it to contact the slide.
- In the Ti Pad set the laser angle for 3100 (approximate) to aim the laser straight up.
- Click the AOTF button to enable the laser.
- Adjust intensity in "AOTF" window.
- Adjust number of motor position (e.g. 3120 or 3205) to aim as close to the cross on the celing as possible.
- Turn micrometer knob on top of TIRF arm above where the fiber enters ("Manual Knob" in picture above) to move the spot forward and backward.
- Focus laser by loosening set screw and moving lens slider (maybe we'll add a picture someday...).
Saving Files:
- Always put a text file in the directory with the images which explains the experiment.
For instance, a sentence what question the experiment is supposed to answer followed by a list of what is in each channel and other experimental details.
Example file to complete and save in each directory of images.
How to take pictures of multiple colors with all in focus.
What to do if the screen is split or has a stripe down the middle.
< Back
Techie stuff:
laser powers as of 20131220 measured with Holger's power meter:
488 nm 118 mW at 110
561 nm 110 mW at 110
641 nm 42 mW
Polarizing filter customization.
Filter blocks in turret:
- (A.k.a. 7) empty
- empty
- Chroma 97327 C-TIRF C126176
zet405/488/561/635x quad-band clean-up/excitation filter, lot 219559
zt405/488/561/640rpc polychroic, lot 219679
(not installed
zet405/488/561/635m quad-band emitter, lot 218269)
- Chroma SRIC 97270 C123208
D535/50x, lot 213289
400dclp dichroic, lot 216467
- Chroma custom SRIC C127947
D530/20x, lot 221463
400dclp, lot 223004
- Chroma 97326 C-TIRF C128562
z488/561x dual-band exciter, lot 221133
zt488/561rpc polychroic, lot 223710
(not installed zet488/561m emitter, lot 223976)
Official Nikon manual (240 pages of PDF).
comments or questions? contact michael.cammer at med.nyu.edu


