Nikon Ti Tiling with Elements software
1. Scan a big field.
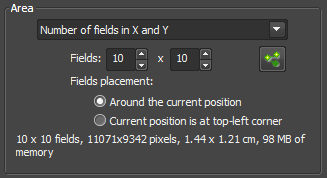
To get an overview scan a big field at low resolution (4X to 10X). Use the menu Acquire > Scan Large Image and position the lens near the center of the field to scan. This can be done by looking at the sample on the microscope stage. Choose a number of tiles likely to be bigger than the structure, such as 10 X 10 or 16 X 20. Also, turn off special stitching modes to speed up processing. And only image one channel.
2. Select the region to scan at high resolution
To set boundary points, right click and find the "XYZ Overview" window in the acquisition options.
The image on the left is an overview of a large area. The outer portion was scanned at 10X. Then a smaller portion was scanned at 40X, which is the higher contrast rectangle inserted, and Elements software updated the overall scan. Don't worry about this; just look at the overall geography. You can zoom in and out using the mouse wheel between the two buttons.
The two green and one red point connected by orange lines are the corners chosen for the next high resolution (40X) tiling image. The cross in the circle is the current position. We can move to anywhere in the field by double clicking on any point.
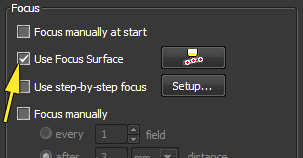
The image on the right shows focus weigh points. We can choose focus points by moving to any field (for instance by double clicking), focusing when in the live imaging mode, and adding the point using the blue plus sign icon. The color map show sthe relative shifts in focus.

These points are propagated to the Acquire > Scan Large Image menu by clicking on the green points icon (left) and clicking the checkbox to use the focus points (right).

Before clicking scan, it is important to make sure the currect objective lens is chosen. "3: 40x" is the LWD objective. "4: 40x" is the correct one; make sure you choose this if using the 40x.

Stitching method. I found the method on the left worked better for fluorescently stained brain slices but Nikon recommened the settings on the right. You choose.

Shading Correction. This if for when the lighting is uneven, such as dark corners. I'm not sure why the Off button is clicked in both these cases because in the case on the left, where the Automatic postprocessing box is clicked, by first clicking on the ellipses ("...") there were options to fix shading problems and after image acquisition they were applied. We have found images look better with shading correction off.

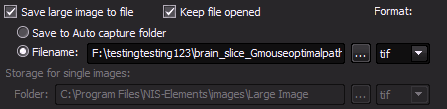
Saving files. There are a few options for saving. You may tell it not to saver anything. You may save only the final stitched image. You may save all individual images. Pretty much self evident:
In summary:
Screensnap during acquisition.
Full size resulting image (as JPG).
Example result of fixed sectioned staned tissue and screensnap of method
last updated 20150624
comments or questions? contact michael.cammer at med.nyu.edu