STARTUP AND SHUTDOWN INSTRUCTIONS FOR LEICA STELLARIS
as of 2025-10-01
A few rules:
- Sign up times are strict.
- All files must be stored on Drive E: Files stored anywhere else will be considered evidence that the system overall is not being used properly; ref Van Halen and brown M&M's.
- Lenses have different immersion media (air, water, gycerol, oil). Make sure you use the correct one.
- All immersion media bottles must be placed in secondary containment. Keep bottles clean. Do not drip. Do not place bottle on any surface other than the secondary containment. Messy oil bottles is indicative of messes eleswhere.
Simple startup:
- Do not put sample on microscope until everything is turned on and the software LASX is running.
- Three power switches. The order is not important, but the computer and microscope hardware must be communicating before LASX is run.
- Computer power - front of computer.
- Box on floor under the microscope: main power.
- Box on floor under the microscope: lasers.
- Additional power for environmental chamber and other optional accessories if you need them.
- Monitors should turn on automatically. If not, go to bottom of this web page to Troubleshooting section.
- Log in to computer as LAS-USER with password posted on the monitor or look under the keyboard.
- Start your session in iLab.
- LASX software.
- A small window will pop up asking for configuration (the window may pop up on a different screen, so look for it).
"Confocal and MP" is the standard.
- Load settings (down arrow button), reuse settings from an image (right click and apply), or set up hardware manually.
To set up manually, turn on lasers and set spectral detections. We recommend fully manual set up of all configurations.
- Optional: load or assign your favorite knob settings.
- Optional: set Fast Live to 512 and bidirectional.
- Optional: set the glow over LUT.
- Before putting sample on microscope, using focus knob on microscope go to low position. Follow these instructions.
- Touch pad on front of microscope controls lighting mode for looking by eye.
- If you are using confocal to collect transmitted light image or second harmonics with the transmission detector, then you must align the condenser for Kohler illumination and open the field diaphragm fully.
There are two imaging modes on this system. The one more like other confocals or a camera system is when the detectors are set for "intensity" or "digital." However, the Gain knob does not behave the way it does on older confocals. This is critical to understand.
We recommend using the photon counting mode which is the new Leica standard.
In both modes, you do not need to fill the entire dynamic range. You may use a portion of the dynamic range and boost the contrast. If you choose to use the full range, DO NOT SATURATE the image.
For visualization only, to see dim and bright scaled together, there is a gamma LUT available in the histogram window at the lower left of the image window.
We highly recommend using the glow over LUT while imaging. This is the mode where the image looks orange and saturated pixels appear blue. This LUT allows you to see very dim or few counts pixels so you are less tempted to turn up the intensity. If there are also bright green pixels, these may be turned off.
If you have multiple conditions where intensity relationships are important or you are checking controls, you must start by setting intensity range for the brightest condition and leaving it there for all conditions. DO NOT SATURATE.
When taking tiled or mosaic images, beware the Task window in the lower right of the screen. This is your friend when you want to collect multiple regions automatically, but it is you enemy if you have multiple regions and you only want to collect one at a time. Before capturing the tiled region, be sure to only have the tasks you want executed checked. (And see below "Saving files")
Shutdown Turn off the system unless the next users it there waiting to use it or explicitly told you they are coming to use the system. It is your responsibility to make sure the system is turned off.
- Turn off lasers in LASX software before quitting the software.
- If you used an immersion lens, clean it. (Do not clean the 10X and 20X air lenses. If they need to be cleaned, ask staff immediately.)
- Set to 10X lens.
- Bring focus down.
- Two power switches off on the box below the table. Do Not touch the key!
- Sign Out of the computer. Or power down the computer.
- Make sure the work area is clean. This includes the floor.
Saving files
Treat each project as a container for each sample or condition.
Name once. Files inside do not need to be named or could be called "Z series"
Each time switch samples, start a new project.
However, these files can get large, many GB. So may want to make a new project for the same sample to keep the file sizes low.
Also, issues of subdirectories within LIF files. These occur with tiling and FLIM. These do not cooperate well with importing into ImageJ, Imaris, etc.
Therefore, for tiled files, copy/paste or cut/move only the "merged" files to another project.
If you are comfortable that you only need the merged tiles file, you could delete the individual images from the project and only keep the merged files. (This will also halve the data size.)
For FLIM, we haven't worked out the details, but each run may be a different project.
Troubleshooting
Nobody is supposed to touch the keys on the system. If the lasers do not work, check if somebody disobeyed this rule.
If both moniotrs do not turn on, manually turn on with the power switch in back.
 |
|
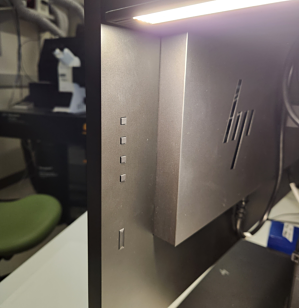
Buttons on rear of display monitor.
Vertical rectangle button at bottom is power. Turning this on should connect the monitor to the computer and automatically be recognized as a second screen.
Four smaller square buttons are used for maneuvering through the sesstings menus. |
Monitors can be reporgrammed to turn on when power starts up:
1. Turn on the monitor.
2. Use monitor buttons positioned at the right back and make sure that the following settings are set: • Main Menu → Management → DDC/CI Support: OFF • Main Menu → Input Control → DP Hot-Plug Detection: Always Active
3. Turn the monitor off and on again. This ensures that the setting modifications are applied.
other notes...
LAX automatically initializes stage on startup, so no sample on the scope!
Top left of screen, Configuration, Turn on laser.
Gear Hardware, Bit Depth 16.
Highlight detector in slider to turn on /off in lower right
Add Laser, turn shutter on in tool with lines and bullets.
For MP and harmonics tracks, pinhole wide open.
For reflection imaging, look in AOBS settings.